Mastering the Art of Property Photography for Better Listings

In today’s world of real estate, a picture is worth more than a thousand words. With the advent of online property listings and virtual tours, property photography has become an essential tool for real estate agents and homeowners alike. A well-captured photograph can make or break a listing, as it is often the first impression potential buyers have of a property. As such, mastering the art of property photography is crucial for better listings and ultimately, a successful real estate business. In this article, we will discuss the key tips and techniques for creating stunning property photographs that will attract potential buyers and help you stand out in a competitive market.
The Importance of Property Photography
Before we delve into the technical aspects of property photography, let’s first understand why it is so important. As mentioned earlier, a picture is often the first point of contact for potential buyers. In fact, statistics show that 44% of buyers look for properties online first, and 95% of them use the internet during their home search process. With such a significant portion of the market relying on online listings, it is crucial to have high-quality photographs that showcase your property in the best possible light. Not only do great photos attract more buyers, but they also convey a sense of professionalism and attention to detail, which can increase the perceived value of a property.
Equipment and Gear
Camera
The first and most obvious requirement for property photography is a good camera. While smartphone cameras have advanced significantly, they may not produce the highest quality images with the level of control needed for property photography. Invest in a DSLR or mirrorless camera with a wide-angle lens, preferably in the range of 14-24mm. These lenses are perfect for capturing larger spaces and creating a sense of depth in your photos.
Tripod and Remote Shutter
Property photography requires you to take multiple shots at different angles and exposures to capture the best possible image. To ensure consistency and minimize camera shake, a tripod is essential. It also allows you to experiment with different heights and angles without having to hold the camera. A remote shutter will also come in handy, especially when capturing photos at slower shutter speeds.
Lighting Equipment
Natural light is the best option for property photography, so try to schedule your photo shoots during daytime hours. However, in some cases, indoor shots may require additional lighting. A flash or external strobe light can help brighten up a room, but be careful not to overexpose your images. Softbox or diffusers will also help to soften harsh shadows and create a more natural and pleasing lighting effect.
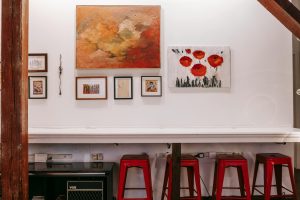
Preparing the Property
The key to great property photography is capturing the space in its best possible state. Before you start taking photos, it’s essential to declutter and clean the property. At a minimum, the rooms should be tidy, and all personal items should be put away. The goal is to create a blank canvas that potential buyers can visualize as their own. Additionally, ensure that all lights are working, and light bulbs are replaced if dim or mismatched. Natural light is the best, so open all curtains and blinds to let in as much light as possible.
Composition and Techniques
Capture the entire room
When taking photos of a property, it’s important to capture the entire room in a single shot. This gives potential buyers a better sense of the layout and size of the space. Use a wide-angle lens and position yourself in a corner to capture more of the room and create a sense of depth and scale.
Focus on the details
While capturing the entire room is crucial, don’t forget to zoom in and capture the details that make a property unique. This could be an intricate molding, a fireplace, or a beautiful view from a window. These details can help potential buyers connect emotionally with the property and imagine themselves living there.
Vertical and horizontal lines
When taking photos of a property, ensure that all vertical and horizontal lines are straight. This can be achieved by using a tripod and adjusting the camera’s position to align with the walls and corners of the room. Crooked lines can make a room look distorted and less appealing.
Edit and Enhance
The final step in mastering the art of property photography is post-processing. Editing and enhancing your images can help create more visually appealing photos and potentially attract more buyers. Basic adjustments such as brightness, contrast, and color balance can work wonders for a photo. There are also various software and apps available to help enhance your images quickly and easily.
In Conclusion
Mastering the art of property photography is crucial for better listings and a successful real estate business. By investing in the right equipment, preparing the property, and using proper composition and techniques, you can capture stunning images that will attract potential buyers and set you apart from the competition. Remember to stay consistent with your style and editing, and always put quality over quantity. With these tips, you’ll be well on your way to creating stunning property photographs and improving your business’s overall success.